


There’s something wonderfully old-fashioned about a homemade Napoleon Cake. Layers of crisp, flaky pastry are stacked with a smooth, creamy filling, creating a dessert that feels elegant enough for a celebration but comforting enough for a weekend baking project.
The best part is the contrast. The pastry gives you that delicate, buttery crunch, while the creamy filling softens each layer just enough to make every bite rich and satisfying. After a little resting time, the flavors come together beautifully.
This Crispiest Napoleon Cake is easier to make than it looks. With prepared puff pastry or homemade pastry sheets and a simple creamy filling, you can create a bakery-style dessert right in your kitchen.
Why You’ll Love The Crispiest Napoleon Cake
- Incredibly Crispy Layers: Thin pastry layers bake until beautifully golden and crisp, giving the cake its signature texture.
- Creamy and Rich Filling: The smooth cream balances the delicate pastry and makes every bite soft, luscious, and satisfying.
- Elegant but Surprisingly Easy: It looks like a special-occasion dessert, but the preparation is much more approachable than it seems.
- Perfect for Make-Ahead Baking: You can assemble the cake ahead of time and let the layers soften slightly while the flavors develop.
- A Dessert Everyone Remembers: The combination of flaky pastry and creamy filling makes this a classic that feels both nostalgic and special.
What Makes Homemade Better?
Homemade Napoleon Cake has a freshness that is difficult to match with store-bought versions. You can bake the pastry until it reaches exactly the level of crispness you prefer and make the filling as creamy or lightly sweet as you like.
You also have complete control over the ingredients. Good-quality butter, fresh dairy, vanilla, and properly baked pastry create a noticeably richer flavor.
Another advantage is texture. The cake can be enjoyed shortly after assembly for a more pronounced pastry crunch or refrigerated longer for softer, melt-in-your-mouth layers.
Ingredients You’ll Need
- Puff pastry – The foundation of the cake, creating thin, flaky layers with a beautifully crisp finish.
- Heavy cream – Gives the filling a rich, smooth texture and helps create a luxurious mouthfeel.
- Cream cheese – Adds body and a subtle tang that keeps the filling from tasting overly sweet.
- Powdered sugar – Sweetens the cream while blending smoothly without leaving a gritty texture.
- Vanilla extract – Adds a warm, fragrant flavor that complements both the pastry and creamy filling.
- Butter – Helps create rich pastry layers and contributes to that irresistible golden-brown finish.
- Salt – A small amount helps balance the sweetness and brings out the buttery flavors.
- Fresh berries – Optional, but they add bright flavor and a beautiful contrast when serving.
- Powdered sugar for finishing – Gives the finished cake a simple bakery-style appearance.
Step-By-Step Direction
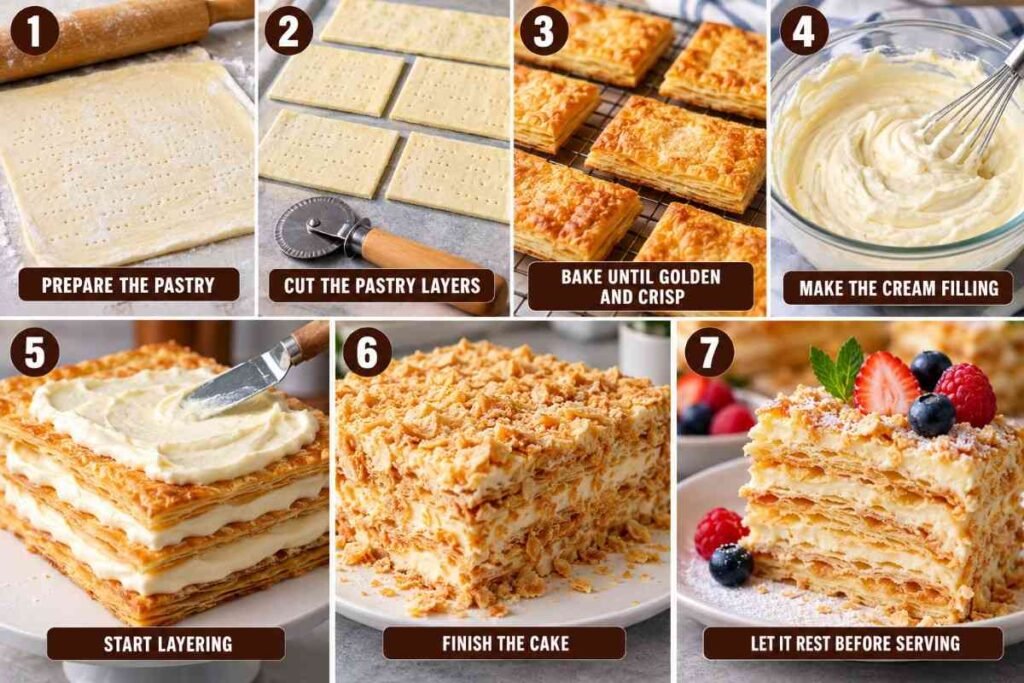
Step 1: Prepare the Pastry
Place the puff pastry on a lightly floured surface and gently roll it into a thin, even sheet. Try to keep the thickness consistent so the layers bake evenly.
Prick the pastry lightly with a fork. This helps reduce excessive puffing while allowing the pastry to develop a delicate, flaky texture.
Step 2: Cut the Pastry Layers
Cut the pastry into evenly sized rectangles or squares. Keep the pieces as uniform as possible so your finished cake has neat, even layers.
Don’t throw away small pastry scraps. Bake them alongside the main sheets and save them for crushing over the top of the cake.
Step 3: Bake Until Golden and Crisp
Arrange the pastry pieces on a lined baking sheet. Bake until they are puffed, golden, and thoroughly crisp.
Allow the pastry to cool completely before assembling the cake. Warm pastry can cause the cream filling to become too soft.
Step 4: Make the Cream Filling
Beat the cream cheese until smooth. Add powdered sugar and vanilla, then gradually incorporate the heavy cream.
Continue mixing until the filling becomes creamy, smooth, and thick enough to spread without running down the sides.
Step 5: Start Layering
Place the first pastry layer on a serving plate. Spread a generous but even layer of cream over the surface.
Add another pastry sheet and repeat the process. Try not to press down too firmly because you want to preserve some of the delicate flakiness.
Step 6: Finish the Cake
Continue layering until all the pastry and cream have been used. Spread a thin layer of cream around the top and sides if desired.
Crush some of the leftover baked pastry scraps and sprinkle them generously over the top. Finish with a light dusting of powdered sugar.
Step 7: Let It Rest Before Serving
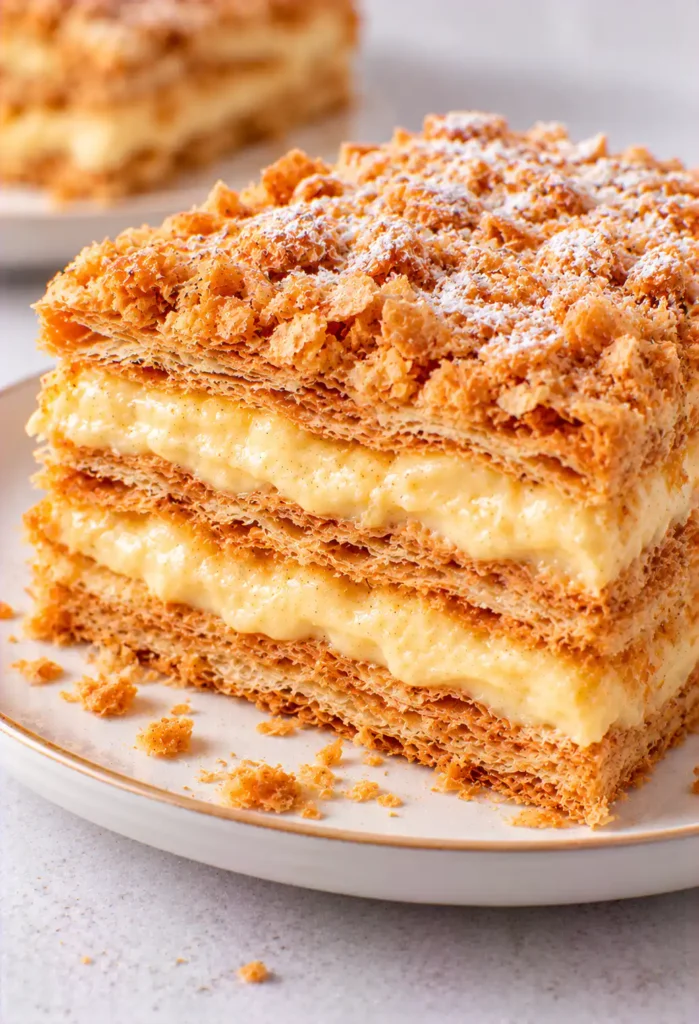
Refrigerate the assembled cake so the layers can settle and the flavors can develop.
For the best texture, allow it to rest long enough for the cream to soften the pastry slightly while still keeping some of its delicate crispness.
Slice with a sharp serrated knife and serve.
Serving Suggestions
- With fresh berries – Add strawberries, raspberries, or blueberries for a bright fruity contrast.
- With powdered sugar – A simple dusting gives the cake an elegant bakery-style finish.
- With fresh whipped cream – Serve a small spoonful alongside each slice for an extra creamy dessert.
- With coffee – The buttery pastry and sweet cream pair especially well with freshly brewed coffee.
- With tea – Serve thin slices alongside black tea or a lightly flavored herbal tea.
- For special occasions – Decorate the top with berries or delicate chocolate shavings for birthdays and celebrations.
Tips for the Best Results
- Keep the pastry cold
Cold pastry produces better layers and helps prevent excessive spreading during baking. - Bake until deeply golden
Pale pastry may not have enough crispness. A rich golden color usually means the layers are properly baked. - Cool everything before assembling
Warm pastry or filling can make the cream melt and cause the cake to become unstable. - Don’t overfill each layer
A moderate amount of cream creates a better balance between crisp pastry and rich filling. - Give the cake time to rest
Resting allows the cream to gently soften the pastry while the flavors blend together beautifully.
Storage Tips
Refrigerator
Store the Napoleon Cake covered in the refrigerator. It is best enjoyed within a few days while the filling remains fresh and the pastry still has some texture.
For the best presentation, keep the cake in an airtight container or cover it carefully so it doesn’t absorb odors from other foods.
Freezer
Napoleon Cake can be frozen, although the pastry texture may become softer after thawing. If freezing, wrap individual portions or the whole cake securely to protect it from freezer air.
Thaw it slowly in the refrigerator before serving.
Reheating
This cake is generally not meant to be reheated. Heating can cause the creamy filling to melt and make the pastry soggy.
If the cake has been refrigerated, simply let it sit at room temperature briefly before serving for the best flavor and texture.
Final Thoughts
The Crispiest Napoleon Cake is proof that an impressive dessert doesn’t have to be complicated. Golden, flaky pastry layered with a smooth vanilla cream creates a combination that is both elegant and wonderfully comforting.
Whether you’re making it for a holiday, family gathering, birthday, or simply because you’re craving something special, this cake is worth the effort. The crisp layers, creamy filling, and delicate sweetness make every slice feel like a little celebration.
If you love classic European-style desserts, this is one recipe you’ll want to save and make again.







Comments 1